
Rasa Conversational AI – Getting Started
If you want to implement Conversational AI (CAI) and have some developer cycles available it is well worth your time to take a good look at Rasa Open Source. Especially if a CAI virtual assistant is something you’d like to have – but isn’t yet a hard requirement. Rasa has an Open Source platform for building chat and voice-based Artificially Intelligent assistants. What follows is a quick introduction to getting started with Rasa. Note that I use Conversational Virtual Assistant, chat bot and virtual agent interchangeably in this article.
There are a lot of solutions out there, and the costs vary dramatically. Not just cost per conversation, but implementation cost and the opportunity cost of the time invested. Many also are priced at a point where the cost per conversation only has an ROI (Return on Investment) if used for handling support calls into call centers. In those situations, the company knows how many employees they have handling calls. There are metrics for the cost per call. This makes it easy to take a SWAG at the deflection rate – that is to say what percentage of support interactions can be handled by AI. From there the ROI looks very good even if the offset ends up being dramatically lower than what was used for the ROI calculations.
Of course if you already know you need CAI and don’t have developers available, you should take a serious look at the managed services. If time to deployment matters they are likely the best route.
But if you are just dipping your toes into CAI, something like Rasa Open Source allows you to start small, see how the progress goes, and decide if it is worth the Level of Effort (LoE). Especially if the technology is a “nice to have” versus a “must have.” If you are really new to CAI, leverage my recommend “Conversational AI Automation Primer” guide.

One of the big positives with Rasa is that the do offer support packages. Plus they have a Rasa Platform that includes a Low-Code User Interface and Bot Tuning. Both are very relevant depending on what in-house development you have as well as if it evolves into something you’ll depend on for revenue.
Another item I really like is that since Rasa uses text files it is much easier to do version control. A lot of other systems out there have odd systems put in place where you have no way to diff versions to see what changed.
Initial Install
I came across multiple pages on how to do an install. I went with a modified version of the steps on the Installing Rasa Open Source page. My system was Ubuntu 22.04.1 LTS. Note that I initially did a “Normal” OS install with it downloading updates during the install, plus installed third-party software for other hardware. Since package dependencies can evolve, you might experience issues that I did not.
The first steps in the instructions are to use pip3 to update pip and then install Rasa. Two issues I came across were that pip3 wasn’t yet on the system, and it would do the later installs into ~/.local/bin.
For the first item, as it was a fresh system, I had to do a
sudo apt install python3-pip
in order to get pip3 installed. This installed 54 packages and also upgraded another 17 or so to use an additional 220MB of disk space.
The next commands did their installs into ~/.local/bin. Doing them as root to make the changes global creates risks of certain problems. Ubuntu has logic built in to add ~/.local/bin, but there is an extra step to do so you don’t have to reboot. First do:
pip3 install -U pip
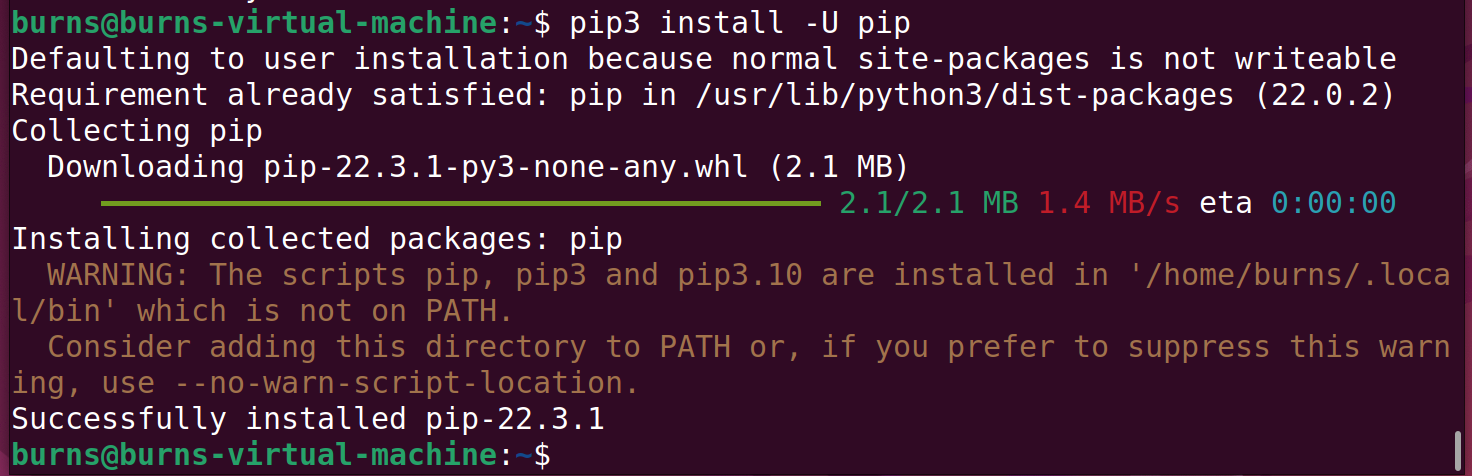
Note the error in brown. Since this is a fresh system, the logic in the ~/.profile file did not execute to add ~/.local/bin to the path. To get that added, type:
source ~/.profile
Whenever you reboot, it will be part of the path. You can confirm that ~/.local/bin is there with:
echo $PATH
Now we can install rasa with:
pip3 install rasa
There are incompatibilities that can arise as different packages get updated. To give an example of the types of issues that have happened in the past:
(This is an example – DON’T run this next step.)
During installation, there is/was a conflict in dependencies of Tensorflow and Rasa i.e. NumPy. Tensorflow requires Numpy <0.19, while Rasa requires 0.19.4. For that example. you need to downgrade Numpy before running Rasa with:
pip install numpy==0.19
(You DON’T need to do this step. It is here as an example.)
First Project
Before we initialize a new CAI project, let’s create a directory structure where we will store our work. Again, I am on a fresh system. I am going to start with a directory called rasa_projects. Inside of that I have a directory per project. The -p flag with mkdir will create parent directories if they doesn’t exist.
mkdir -p rasa_projects/firstbot
cd rasa_projects/firstbot
For each bot you are building, you’ll want to create a fresh directory to keep all the data in. In my case, those directories would be in ~/rasa_projects. Besides copying files to backup copies, all commands here should be run from the project directory. In this example that is ~/rasa_projects/firstbot’. This example directory structure is just something I chose. You can create what works best for you.
You can now create a new project here with:
rasa init
This creates the various template files and framework for a new assistant. You can press the enter/return key to build in the current directory. Also press “Y” to train the model. Go ahead and answer “Y” to speak to it on the command line. You’ll be able to exit with “/exit”

If you aren’t familiar with Conversational AI, there are a few terms you should get familiar with. I recommend my “Conversational AI Automation Primer” article. But here are the quick key items:
- What you type in, or say, I consider to be an utterance. This is a free form message that can be expressed many different ways. Try “are you real?” first. Note that the term “utterance” is used in the Rasa code and docs differently. I’ll research more and update here.
- You’ll notice that the response is “I am a bot. Powered by Rasa.” It turns out that the utterance “are you real?” matches an intent. An intent is what the human intends to learn or intends to accomplish. In this case that phrase matches an intent called “bot_challenge.” You can see the utterance matches that intent by opening another terminal and taking a look at the data/nlu.xml file.
- Try out a few other sentences in the shell. Then type “/stop” when you are done.
You can revisit the shell later with:
rasa shell
There is a sheet of Rasa commands that is worth bookmarking. At the top is a “Cheat Sheet” followed by more details per command.
A few other terms to know:
- Entity – a piece of information that can be extracted from the utterance. If the user asks “What is the weather in Wendover, Utah?” the NLU should recognize this is an intent to get the weather for a specific location. The NLU can also extract the entity location of Wendover. If that entity is not present, the system should then ask for where the user wants the weather for.
- Story – this is the possible ways the conversation can go. In Cognigy I would think of these as Flows. In the Cognigy UI it is much easier to setup the logic and visualize how it works. Again, not a ruse here – rather another way to understand what those ones and zeros are doing.
- Actions – more detailed tasks the CAI bot can take on. Farther down you’ll see an example. In Cognigy you’d leverage a code node and perhaps an extension.
If you are new to CAI, it also might be worthwhile to check out some of the free trials out there. They’ll give you a chance to see the process at a higher level. They might even have free training available. But the reality is that most CAI solutions distill down to a Natural Language Understanding engine sitting in front of manually created flow charts.
Adding Intents and Replies
We will start off with a quick example of adding a FAQ type of reply. These are simple questions with simple answers. Ones where no logic is needed. For this example there will be an intent to find out how the CAI Virtual Assistant works. I’ll walk through adding the components to the different files and seeing that it works.

You should be in the ~/rasa_projects/firstbot directory for these commands. One item – either use a versioning system like GitHub, or make copies of your files. I tend to keep a .orig and a .latest version when I am tinkering. For example:
cp domain.yml domain.yml.orig
Edit the original file, and under intents, add:
- how_bot_works
Then under responses, below the utter_iambot lines, add:
  utter_how_bot_works:
  - text: "I am a Conversational Virtual Assistant.   That means you can type out your
questions here as if you were speaking to a person.  I won't always have an answer
but will try to help when I can.  Note my creators watch the logs of our
conversations and work to make me smarter."
Now backup the data/nlu.yml file and add the following to the bottom of the original file:
- intent: how_bot_works
  examples: |
  - how do you work?
  - how does a bot work?
  - how do I use you?
  - what do I do?
This is not all that we will have to do, but I want to walk you through a few commands so you can see how the steps are related. Note that all intent names have to be unique.

No Training Yet
They don’t call it “Artificial Genius” for a reason. The “Artificial Intelligence” virtual assistant has to be taught and learn. Just like kids have to start in kindergarten and work their way up through the later grades*. Let’s get into the shell and see what happens if we don’t do any training:
rasa shell
Now enter one of your utterances. “How do you work?” Notice that nothing happens.
/stop
to quit the shell. You could try the “rasa shell nlu” command here to see that the intent is not found.
Training
Now run
rasa train
from the command line to train the bot with your new intent.
Use rasa shell again, try out your utterance. You still won’t get anything back. There was something that happened in the background, and I need to show you how to get visibility into that. You see Rasa understood the intent, but there was no fulfilment. That is to say that there was no response or action to do for that intent.
To see/confirm what your intent your utterance matched, run:
rasa shell nlu
This gives more insight to what the NLU understood. You’ll have to scroll up to see something like:
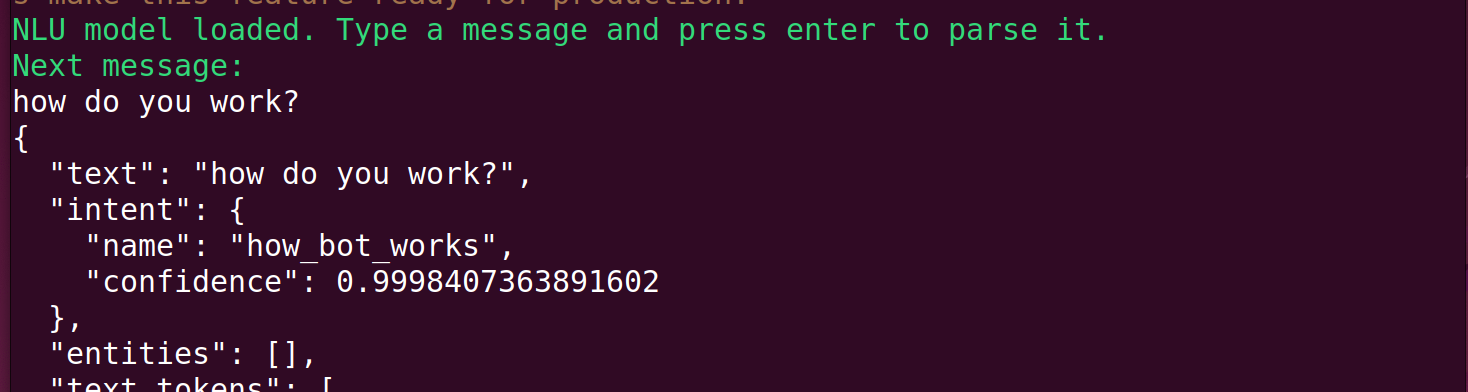
The two items to look for here are the name of the intent and the confidence level. We can see the name did match the intent. If the confidence is not expressed as scientific e notation, then multiply it by 100 to get the percent. Here we have a 99.98% confidence. Scrolling farther down, you’ll see numbers like “4.8655019782017916e-05” which translates to 0.000048655019782017916 as a real number. This is approximately 0.0048%. If you can’t translate exponential numbers in your head, use an online Scientific Notation Converter. Note you could have run the above step before you trained to see how the utterance could not find a matching intent.
You can exit the shell with Ctrl-c.
So why did nothing show up? It turns out we need an entry in the rules file to tie the intent to the utterance.
Rules
To enable Rules, you need to add the policy to the policies section of the config.yml file. Under policies, add – name: RulePolicy. When done, this part of the file will look like:
policies:
  - name: RulePolicy
Then in the rules.yml file, add:
- rule: Tell how bot works
  steps:
  - intent: how_bot_works
  - action: utter_how_bot_works
Train and try out your updates:
rasa train
rasa shell
This time you’ll see the uttering back to you:

Custom Actions
If you want to interact with other systems or do more sophisticated Natural Language Generation (NLG), you’ll use a Custom Action. Let’s create a sample one just to show going beyond a static answer. I want to add one for having the bot say how the weather is for the city where its server is located.
In the domain.yml file, add the following intent:
- bot_weather
And after the responses, add:
actions: - action_get_bots_weather
For the data/nlu.yml file, add:
- intent: what_is_bots_weather
  examples: |
  - what is the weather where you are?
  - are you cold?
  - are you hot?
  - what is it like where you are?
For the data/stories.yml file, add:
- story: weather at bot
  steps:
  - intent: what_is_bots_weather
  - action: state_bots_weather
In the endpoint.yml file uncomment the action_endpoint line and url line below it:
action_endpoint:
url: "http://localhost:5055/webhook"

In the actions/actions.ph file, you’ll create a more complex action and bit of coding:
import requests
from typing import Any, Text, Dict, List
from rasa_sdk import Action, Tracker
from rasa_sdk.executor import CollectingDispatcher
from rasa_sdk.events import SlotSet

# Based on https://pub.towardsai.net/rasa-101-building-a-weather-assistant-244489316d11
class GetBotsWeather(Action):
  def name(self) -> Text:
    return "action_get_bots_weather"

  def run(self,
      dispatcher: CollectingDispatcher,
      tracker: Tracker,
      domain: Dict[Text, Any]) -> List[Dict[Text, Any]]:
    api_token = "<your API code here>"
    url = "https://api.openweathermap.org/data/2.5/weather"
    lat = "38.3396"
    lon = "122.7011"
    units = "imperial"
    payload = {"lat": lat, "lon": lon, "appid": api_token, "units": "imperial"}
    response = requests.get(url, params=payload)
    if response.ok:
      description = response.json()["weather"][0]["description"]
      temp = round(response.json()["main"]["temp"])
      msg = f"The current temperature where I am is {temp} degree Farenheight. Today's forecast is {description}."
    else:
      msg = "I'm sorry, an error with the requested weather as occured."

    dispatcher.utter_message(msg)
    return []
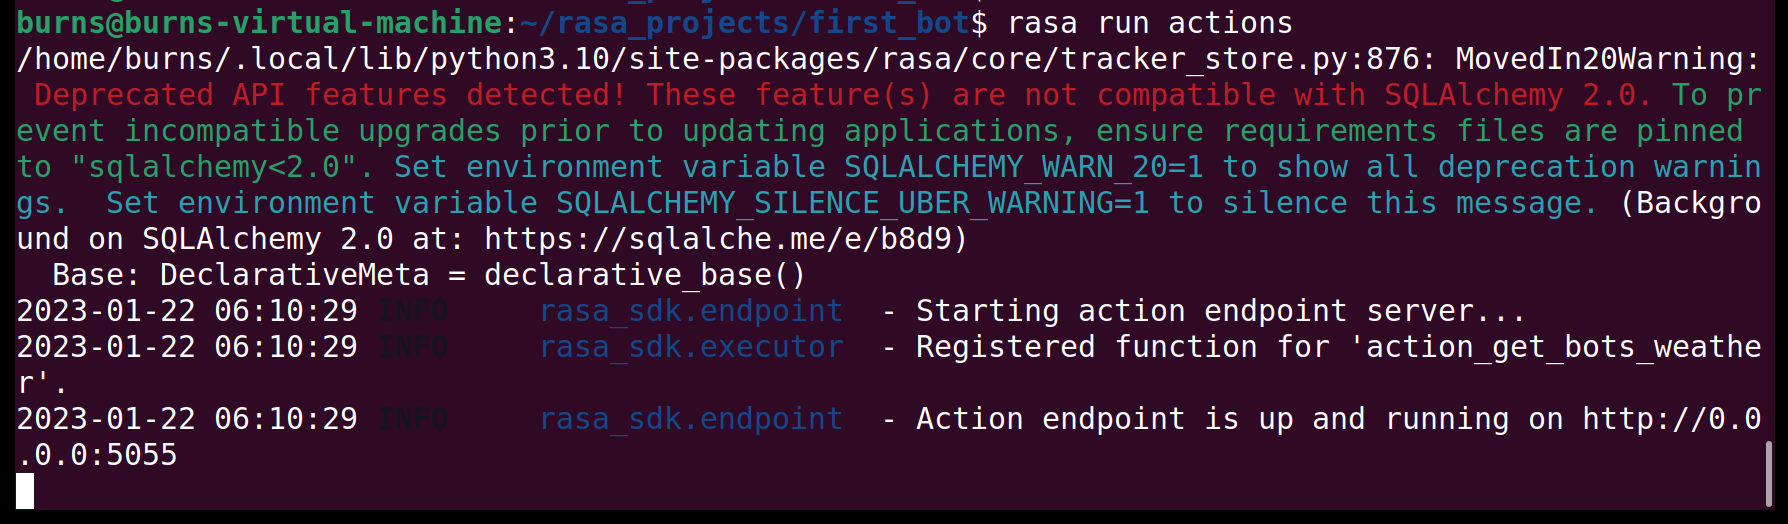
Indents are critical when working with Python. To see the last part work, you need to open up another window and start the Rasa SDK Actions Server. You should also train the system first. From the base directory of this project (~/rasa_projects/firstbot):
rasa train
rasa run actions
Note that any debugging print statements will be displayed here. When starting up the Rasa SDK Actions Server, you should see:
In your other window, get into the shell and see if the weather action works.
rasa shell
And then ask “How is the weather where you are?”
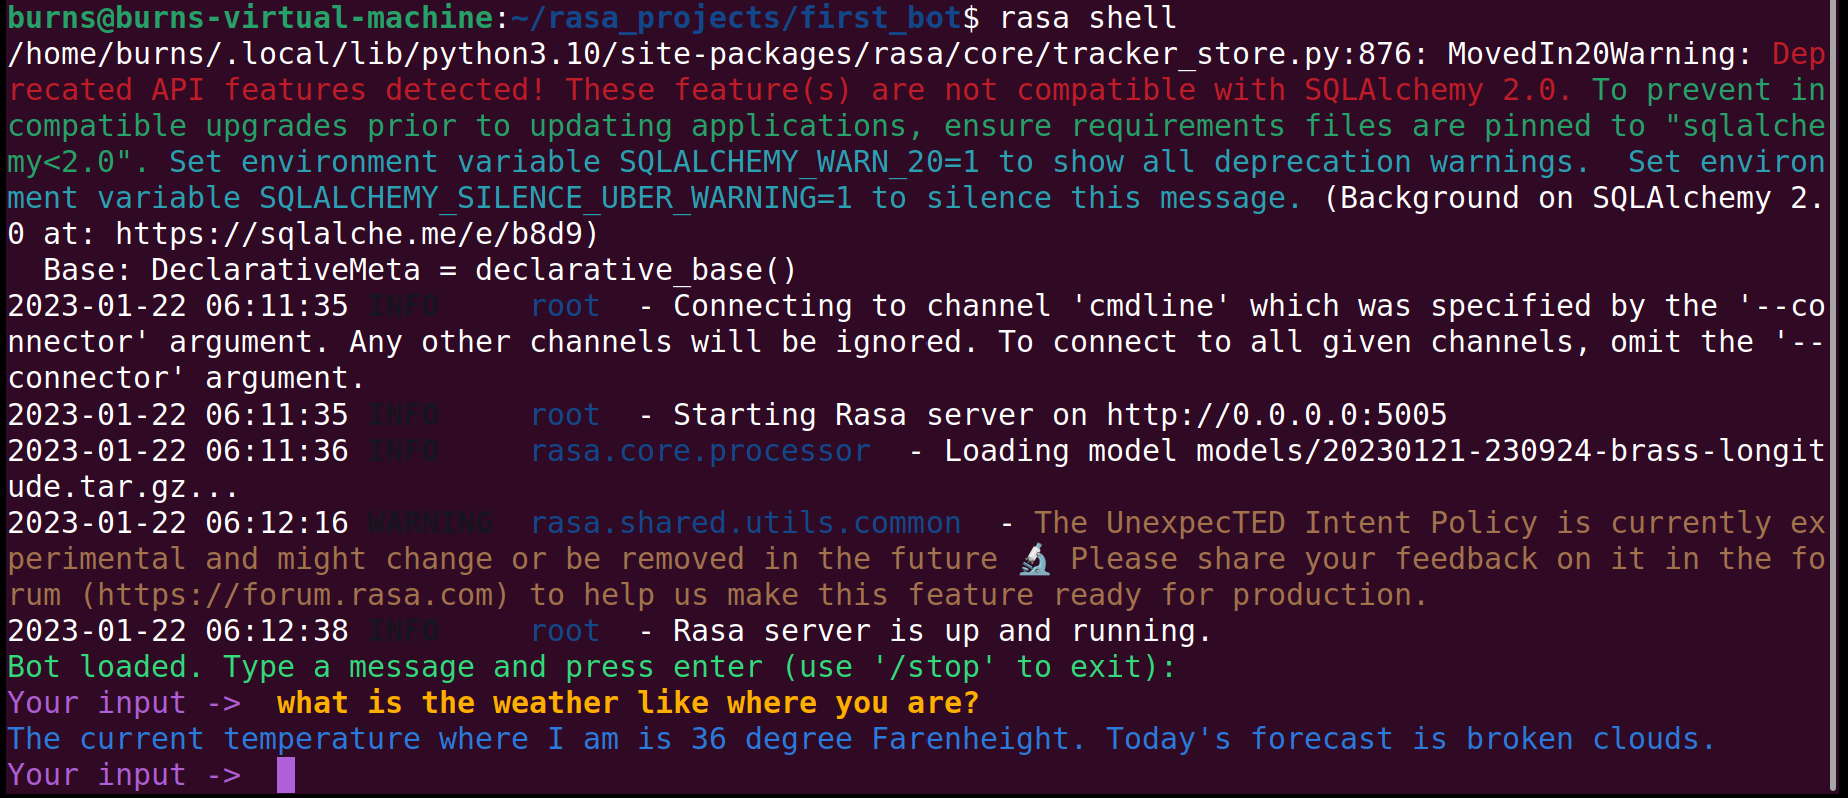
Success! I’ll add a link to a GitHub repository with the updated files.
Smarter Design and Coding
A few readers are shaking their heads about my custom Action. A better practice is to have a method that retrieves the weather based on a longitude and latitude. Then have a method that uses these details to provide the details to a user if they are asking for the weather in a specific city. And of course have a method that uses the bot’s location and generates the message about the weather where it is. You can leverage the first method for other locations in other conversations. You can then create intents for both use cases. One will need the location, the other won’t. Note you also need to convert the city to longitude and latitude.
In Conclusion
There should be enough components here that you can get started with Rasa. Add each item one at a time. For example, implement and test the Rule before you implement and test the custom Action. You’ll find that if you take on too much, that the errors in Python turn into so many lines it is hard to solve if you don’t have much experience. I plan to set this up for my blog and just see how it goes.
* In my first I said “and work their way up through College.” The reality is that those of us in tech need to better acknowledge and respect the trades and careers that don’t involve college.
Photo by Possessed Photography on Unsplash, Element5 Digital on Unsplash