How To Build a System Workbench
With the growth of the Cloud, fewer and fewer people actually put their hands on hardware. But there are times that a cash-strapped startup, consultant or a frugal hobbyist/entrepreneur will want to get a MVP (Minimally Viable Product) up and running without having the recurring expense of deploying in the Cloud. Especially with how cheap business Internet plans are with static IPs that you can then combine with a modern CDN. There also is a responsibility to properly wipe drives when recycling or reusing old equipment. My last home project of 2018 yesterday was building my bench for working on systems. I wanted to share some of those details.
Now my needs are a bit different. At times I’m asked by friends or family members to restore or repair systems. I’ve also got a stockpile of old drives that I need to properly wipe before recycling or reusing. And then there is the list of projects I’m tinkering on when I need down time, distraction or skill growth.
For my work space I’ve got an adjustable bench that came from the incubator where we used to run GarageCity. For now there is just a work surface that matches my main desk sitting on it, and at some point I’ll permanently attach it as well as the recycled industrial keyboard tray I picked up. And of course a nice tall chair is on the list.
Components include:
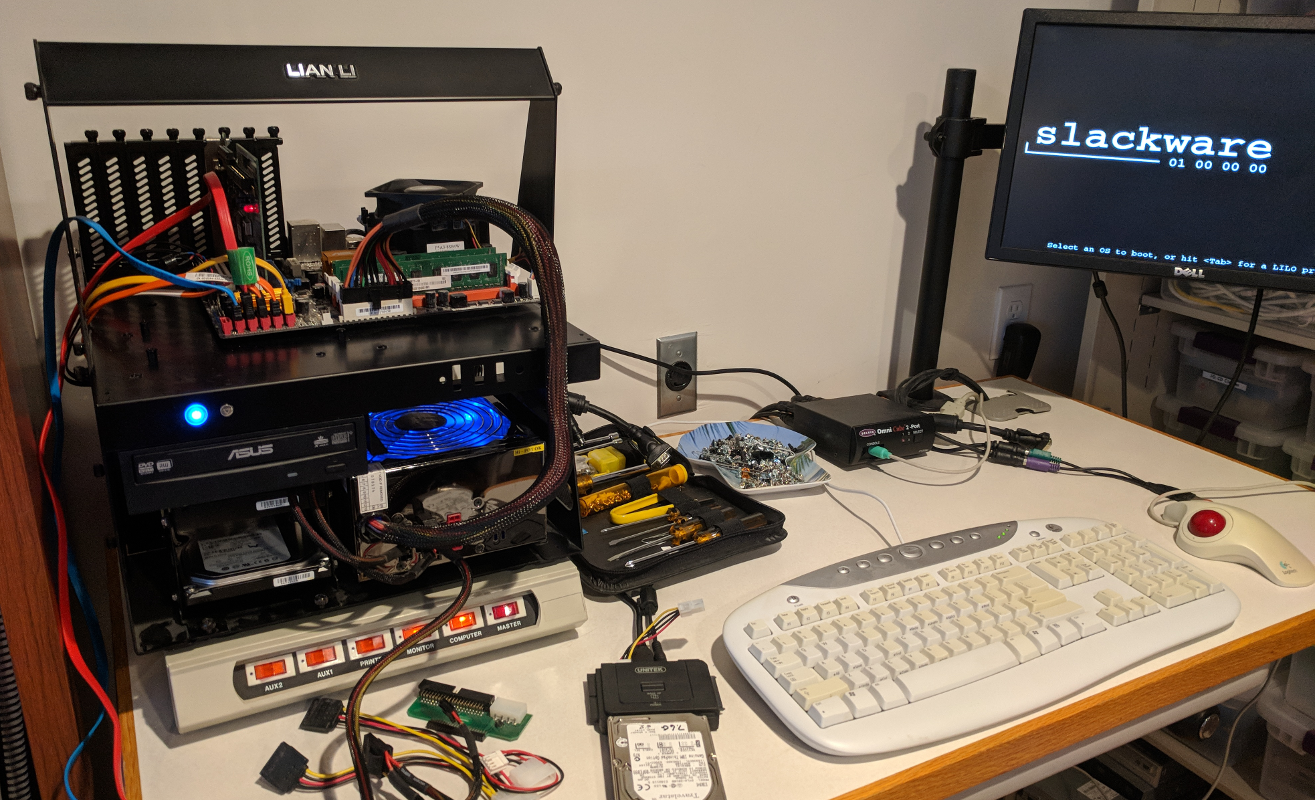
- An open air Lian Li Case, which is rather old. My one minor regret is not buying the front panel for the HDMI and USB ports. So if you buy a newer open air case, consider getting the port adapter now while they are still available. For now I’m just using a USB extension cable to make switching items easier, but will probably mount a USB bracket somewhere on the front of the case. For what it is worth, I also put together various systems for other hobbies and have a small stockpile of components to test and weed through. Update: After posting this I realized that I’ve got an unused 5.25″ bay in the case – this is a smarter solution – a 5.25″ bay with a fan control and USB ports.
- I’ve added a rather old motherboard with an extra 1TB drive to copy files onto before wiping drives. I might go with a cheap solid state OS drive to speed it up as well as reduce noise. Right now it just has PCI and a small PCIe slot. At some point something newer will go in, but it all depends on what I come across for cheap.
- Power supply is modular and came from the first used PC my son bought and has since upgraded. This reduces the clutter and unused wires.
- Adaptec AHA-2940/UW SCSI card. That collection of drives that I am asked to wipe include a variety of SCSI disks. (It is amazing what is still in use these days.) Sometimes the system is dead enough that I can’t boot of a CD or DVD to use it to do the wiping. Again, I’ve got a different use case here.
- I’ve still got my first PC Tool Kit from years ago. (Link is just an example.)
- An old surge protector with individual switches to be able to power cycle specific components. There is an extra power cable in it for when I temporarily work on built systems here.
- I’m using a UNITEK Y-3322 USB 3.0 to IDE + SATA Adapter. I really like it because it has a separate power switch and works with SATA, IDE and laptop IDE drives. It also has a power adapter for the ID drives. Lastly it seamlessly functions with Linux. One minor negative is that the light does not flash with drive activity. (Other UNITEK USB adapters do, which is nice.)
- If you’ve got old KVMs, I’ve found that the UNITEK USB to PS/2 Converters work. It’s hard to recycle an 8 port KVM with all the cables and spend the money on a new USB one. For this bench, an old 2 port KVM is more than enough for the limited space. I can toggle between a system I’m temporarily working on as well as the open air system.
- At some point I’ll add a peg board in the middle with mounts for tools and a separate work light.
- The monitor stand came from Craigslist for $10.
- The monitor was recycled, but I may upgrade to one with different inputs, like HDMI. Make sure the monitor you get has a VESA mounting pattern on the back. A better option might be to use an HDMI converter with the KVM. Time and future projects will tell.
- You’ll see from the photo I’m running Slackware. Linux distros are like religion, politics or arguing about car makes. Either way, go with what you can work fast with. Leverage GRUB or LILO to have multiple operating systems for different tasks.
So the planned updates, some day, include:
- A 5.25″ bay to get the USB ports to the front, plus control the extra fans I might add.
- I’d like to add a 12-14″ extension from the modular power supply to the motherboard to route it in a nicer way.
- Perhaps an SSD for the OS drive to make it a bit quicker and quieter.
- I’ve got other 1TB drives kicking around. If they don’t get used in a Spark cluster I might put in a RAID 1 array for where I copy the files. Not really needed, but nerd-fun. And I realize that this contradicts the desire for lower noise.
- In the spirit of the adapter for the HDMI/USB ports, I might pick up a dual fan bracket while they are still available. Yes, I don’t need it, but another nerd-fun item.
- I’ll add a Windows partition for some of the file-restore applications that I use. I’ve yet to find their equivalent on Linux. (The apps exist, just aren’t as mature or dependable yet based on my experience.)
- I’d like to get a fan on the spinning drives I am using. Wondering if this would work.
With time you’ll install applications and utilities to do certain chores and save time. Yes, the Cloud seems to be where everyone is going. But if you have a data center, are hybrid, do consulting or need to build MVPs from recycled gear having the right tool is half the job.